Showing posts with label auto repair. Show all posts

Thursday, April 23, 2009

Some Do's & Dont's While Replacing Fuel Filter

Dos and Don'ts of Fuel Filter Repair
Changing fuel filter must be easy for you now, but you need to keep a check to avoid any mishappening or any mistake. Since every process has few 'Do's & Don'ts, so does the procedure of replacing fuel filter has. A glance at these instructions would definitely ensure safer fuel replacement process. Read on to find the "Do's & Dont's While Replacing Fuel Filter."

Do's While Replacing Fuel Filter

Make sure to drain the fuel tank before removing it for cleaning.

Always keep in mind that the fuel to be used should be in a sealed container.

Its important that automobile battery should be disconnected before starting the process. The failure in which will lead to accidental sparks that could be dangerous.

Check the filter to ensure that it does not leak and is snug. Usage of gasket sealer to filter threads helps in a leak-free connection.

Cross check the hose clamps for their position. Make sure they are properly positioned as well as tight.

Don'ts While Replacing Fuel Filter

No Smoking – Never smoke while you are repairing or replacing the fuel filter. It isfuel hose advised that you should also keep away all kinds of electrical systems to avoid any damage to them as well as any harm to yourself.

At the time of replacing fuel filter, one needs to tighten the screws into inlet fitting on carburetor. While doing so, never overtighten it. You might damage the threads in carburetor.

Never use RTV silicone sealer that dissolves in gasoline to prevent leakage. Even teflon tape should also be avoided.

Try not to bring in use old rubber hoses at the time of replacing in-line filter.

Thursday, April 9, 2009

7 Steps to Replace Fuel Filters

A little attention and basic knowledge about the fuel supply system will help you follow these Do-It-Yourself (DIY) tips to replace fuel filters easily. When you know that it is time to change the fuel filter, you should also know how to do so. If you don't know how to, read on to find it.

fuel filter
Steps to Replace Worn Out Fuel Filter With New One

First Step – The very first step is to relieve the pressure in your fuel lines and fuel filter. For this you need to start the car first carefully pull the fuel pump fuse or fuel pump relay out. This should be done with engine running. This way you can release all the fuel pressure from the fuel lines. Remember, if you don't release the pressure, explosion can take place while changing fuel filter.

Second Step – The next step is to use wrenches to unbolt the fuel filter fittings. Now try sliding the fuel line off the bolt. Also unscrew the bolt on the other side of the fuel filter. Now that you have taken off the bolts, make sure you keep them properly. You will need them while fixing the new fuel filter.

Third Step – You can now easily remove the old fuel filter. While removing it, you may also find that a small clamp. A screwdriver can be used to release this clamp.

Fourth Step – Closely observe the position of old fuel filter before removing it because you have place the new one in the same position.

Fifth Step – Don't forget to change the washers too. It is important that you change the pressure washer that can be found with the fuel line bolts.

Sixth Step – Now take the new fuel filter and place it at its position. Now just try to snug down the clamps. Fix it properly and tightly so as to prevent any fuel leakage. Also fix the bolts that you had kept aside. Make sure you tighten them properly with the use of wrenches.

Seventh & Last Step – Start the engine to check. Once you have replaced the fuel filter, you need to run the car's engine. Now check the fuel filter for any loose connections. Also check for fuel filter seal.

These 7 steps to change or replace fuel filters are easy, but need to be followed carefully. Just change your car's fuel filter to enjoy longer and trouble free drive. Happy Safe Driving!

Keep following to find out "Some Do's & Dont's While Replacing Fuel Filter" in the next post.

Thursday, March 12, 2009

Top Tips for Car Battery Maintenance - Part II

In the earlier post, we covered some tips to keep our car's electrical system function properly. Here are few more maintenance tips for Your Car's battery...


Tips No. 7 - Keep a check on when Service is needed – Different cars come with maintenance free battery. Regular check is needed for such automobile batteries. There is a light in maintenance free batteries that goes black when service is required.

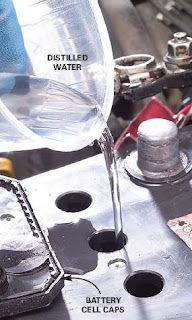
Tip No. 8 – For Conventional Car Battery - These batteries come with a plastic cover that can be easily removed to check the water inside. It is important that the water inside the battery reaches the filler necks.

Car Battery CareTip No. 9 – Be Careful While Adding Water – Incase there is less water inside the battery, you may also add distilled water. I guess I should warn you at this moment. You might just harm yourself if you don't be careful. The battery acid that is highly corrosive might harm your clothes.

Tip No. 10 – During Battery Check – It is important to make sure that you do not keep any kind of open flames near the car battery. Automobile battery contains chemicals that are combustible and hence can be dangerous.

Tip No. 11 – Over Charging Should Be Avoided – This is common and known to everybody that a dead battery can be charged using a battery charger. Improper charging of a battery is something that should be avoided. It might also lead to damage of battery's as well as car's parts & components.

These were some of the battery's maintenance tips that are to be followed in order to keep your car's battery in best condition. The smooth functioning of automobile battery helps you have a tension free long drive. You can try these car parts maintenance (D-I-Y) tips yourself. Have a Happy & Safe Driving!!

Wednesday, March 4, 2009

Top Tips For Spark Plug Repair

In the previous post, we covered the problems with the automotive spark plugs. Now that you know these problems and what causes them, it would be great if you also know how to repair your car's spark plugs. Probably, you would be able to save some money on auto repair.

Spark Plugs form a part of the automobile ignition system, hence we would also have a glance on D-I-Y tips for repairing of ignition of the vehicle. Follow these auto parts repair instructions coming weekend, if you have been successful in diagnosing spark plug problems.
auto parts repair
Do-It-Yourself (DIY) Tips
  • The first tip always for any auto part repair is to go through the carmaker's manual. Read it carefully to avoid any kind of confusion at the time of repair. Every manufacturer specifies the time for changing of the car's spark plugs. If its time, do not delay in replacing the auto part.
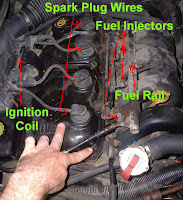
  • It is essential to ensure that the other auto parts connected or related in the functioning of spark plugs are in proper condition. If the ignition wires have burned, they need to be changed too.
  • For checking the wires – Have a look at the the ignition system at night. Its easier to notice the shorting of wires at that time.
  • Try checking the spark plug wires by pulling each and every wirespark plug wires manually. First switch off your engine and let it cool for some time, else you might harm yourself. Once you pull out one wire, check it for burns, cracks or any kind of discoloration. If found O.K. fix the wire back into its position. Follow the same step to check all the wires. Any damaged wire should be immediately replaced.
  • Remember : Do not pull out all the wires at the same time, rather pull them one by one. Otherwise, you might get confused while fixing them in right terminals, causing more auto repair loss.
  • Change the Spark Plugs – the first step is to clean the debris accumulated on the well of this auto part. Avoid any dirt or dust to fall into the combustion chamber. You may also blow air into the well or brush off the debris so as to clean it properly.
  • Now remove the spark plug wire. The next step follows is to keep the plug socket over the plug & then unscrew it.
  • Its time to pick up the new plug. Now just start threading it. Only thing that you need to remember is to not cross- thread it.
  • Now take the plug & socket and them try lowering it into the plug well. Then screw the plug with a socket extension.
  • Once you get the feel that the thread have matched, you need to use a ratchet for tightening the plug in its place.
That's it friends, you have successfully replaced your car's spark plug.

Tools Required During Spark Plug Change Procedure
  • A Half-inch Ratchet Drive
  • A Spark-plug Socket with Rubber Retainer
  • A Flexible Drive Coupling
  • Socket Extensions
  • Needle Nose Pliers
Other Things
  • Small Stepladder
  • A Cloth Shield
  • A Protective Eyewear
  • A Narrow Paint Brush